From Netta, With Love

IMAG1098

Update on From Netta, With Love.
So we have decided that this winter instead of donating the hats to a local place (since I have not been able to make up as many as I had wanted) that we will make up care packs to hand out when we see people in need. The care packs will be a gallon zip-lock bag packed with

1 Hat and an assortment of the following:

*Washcloth/Bar Soap

*Wet Wipes

*Deodorant

*Toothbrush/Toothpaste

*Band-Aids

*Tylenol packs (maybe)

*Hand Warmers

*Chapstick

*Comb

*1 pair of Socks

*1 pair Gloves

*Razors/Shaving Cream

and maybe other possibilities…

We will be buying these supplies as we can. We are price comparing right now. eBay is looking to be our best option as long as we can avoid high shipping prices.
I will try to keep everyone updated with our progress.

I am really looking forward to this adventure.

It has been asked if we will be accepting donations of any of the items listed above and the answer to that is ABSOLUTELY! 🙂 Anything and everything is greatly appreciated.  If this is something that you would like to do comment here and we can iron out details.

It is in your hands to create a better world for all who live in it.

-Nelson Mandela


“From Netta, With Love”


One day while working on a crochet project I was thinking about a conversation R and I had had awhile back.  In the area where we live in it is not uncommon to see someone down on their luck standing on the lane dividers at intersections asking for any help people are willing to give.  Now, I know there are some individuals who will do this even when they don’t “need” it or that will scoff if they think you gave them to little of an amount but every time he mentions that someone is standing there my heart suffers a sadness.  One of my greatest wishes is for everyone to be comfortable in life.  To not have to worry about if they will eat today or whether they will have a place to sleep tonight or if they will have to sleep outside and battle whatever weather we may be having.  To feel safe and warm.

IMAG1098


While sitting there I was trying to figure out a way I could help…..and then the light bulb went off.  The answer was literally right in front of me.  I may not have anything to give money wise but I do have yarn.  I can crochet.  I then went on to think of what I could make.  At first I thought about mats crocheted using plastic grocery bags like I had heard about on Facebook but quickly realized as awesome as that would be it was just not something I felt I could tackle on my own.  The turn around of finishing one would take me an enormous amount of time due to what it took to simply prepare the bags to crochet.  So for now that thought has been filed in the brain box to possibly be revisited another day.  It was then that I thought about how uncomfortable it can be outside when it gets cold.  Another light bulb.  Hats.  I could make hats.


I am not the fastest crocheter but I have decided to challenge myself to make a minimum of one hat a day.  365 hats in a year?  I think I can do that.

Project decided, I then thought about how I would want to hand them out.  Not being able to drive or navigate unfamiliar areas on my own put some limitations on my options so I thought about who could do the that part of the “leg work” and I immediately thought about local charities.  From there this is what I decided…

  1.  I want to keep a small box in our car and when he sees someone while we are out and about down on their luck I want to give them a hat, thoughtful words and a smile.  And…
  2.  I am going to pick 2 charities/organizations (Links to their websites are below)  and I am going to start making donations.  As of right now I plan to alternate yearly between the two.  If I am able to crank out more hats that I am anticipating then I will divide them between the two charities.

It may be a small gesture but if I can help even one person be warm and not have to make the decision of whether they will eat today (or for several days) or use the money they have collected to buy a cheap hat to help keep them warm than I will be happy.

Chosen charities/organizations:

Horizon House: Website

Wheeler Mission Ministries: Website

Acknowledgements: I would like to thank R, my family and all of my friends who have been so supportive with this decision. I would especially like to thank my book sisters from Bink’s Clubhouse for helping me decide what to call this hat adventure that I am going on. They made name suggestions and then voted on favorites. A special hat tip to Manda Laurie for suggesting “From Netta, With Love”.

“We ourselves feel that what we are doing is just a drop in the ocean. But the ocean would be less because of that missing drop.”

-Mother Teresa


Homemade Noodles

R loves his Aunt Janice’s homemade noodles so when I came across a recipe on Facebook I shared it thinking I would give making them a whirl.  Now, I tried following the original recipe I came across and I have no idea what I did wrong but wow.  What I ended up with was a tough ball of dough that still hadn’t had all of the ingredients kneaded in.  I wish I would have thought to take a picture because I could barely make an indention in it with my finger LOL.  Deemed a disaster I 86’d it (threw it away) and started over.  For the most part I followed the ingredients of the original recipe (I used milk instead of ice water), adjusted the amounts a little to work better for me and mixed them together in a slightly different way.

Ingredients:

3 Eggs

(3)  1/2 eggs shells of Milk  (measure this using 1/2 of one of the egg shells you just cracked)

1/4 tsp. Salt

3 c. Flour

1 1/2 tsp baking powder (optional) -this will give you a “thicker” noodle

noodle ingr.

In a bowl, measure out your flour.  Make a well in the middle of your flour and add in the eggs, milk and salt.  Using your fingers whip the wet ingredients while pulling the flour into the mixture.  Once it is mixed  knead the dough until you have a nice noodle ball 🙂

noodle ingr. in bowlnoodle ball

Flour a flat surface and roll out your dough until it is thin.  The original recipe said roll it until it was an 1/8 of an inch thick but I rolled it out until it felt thin enough to me.  I also cut my dough in half and rolled it out in two batches as my counter space is very limited.  Once you have your dough rolled out use a pizza cutter (or knife) to cut it into thin strips.  You can keep them long but I cut mine into shorter strips .  Lightly toss your noodles with the flour that remains on your surface and spread your noodles out on a covered surface to dry out a little bit.  I put sheets of wax paper on top of my stove to accomplish this.

noodle ball and ct noodlesrld n ct nd ct n

all n rld out.jpg

The original recipe says you can store your noodles in the fridge 2-3 days or in the freezer 1-2 months.  I will be using all of these but have plans to make more soon that I can freeze for later use. When I do this I am going to slide the wax paper onto a baking sheet, cover it and sit it in the freezer for a while so the noodles can freeze up a little bit before I put them into a gallon zip lock bag.  This will keep the noodles from freezing in chunks.


For the noodles I am going to cook I will be adding them into the following….


IMAG1214

2 Chicken breast boiled and shredded

1/2 onion, diced

2 stalks of celery, diced

1 carrot, diced

2 cups mushrooms, sliced

2 cartons Chicken broth

Water you boiled the chicken in (add 2-3 chicken bouillon cubes if you like a strong chicken broth flavor)

In the pan of left over water add 3 bouillon cubes (optional), the broth, carrots, celery and onion.  Cook on medium heat until carrots are cooked through.  Add in the chicken and mushrooms.  Stir and let cook for another 5 minutes.  At this point  turn up the heat to medium high until the broth is lightly boiling and add in the noodles.  Cook noodles for 7 minutes.  Season to taste.

IMAG1217.jpg


Final thoughts and future adjustments:

IMAG1218IMAG1219

  • The adjustments I made to the original recipe made for a nice dough.  Not to loose yet not tough.  I will definitely be making more of these noodles up and freezing them.  They will be a nice freezer staple.
  • I liked the flavor of the noodles but I will be looking in to how to make them more fluffy.  They have a very dense texture but I would like to see if I can get them between a dense noodle and a fluffy dumpling 🙂
  • I think playing around with adding spices to these noodles could be fun! Or even adding in veggies somehow.
  • I put all of the noodles I made into my soup. As much as I liked it there was just to many.  Next time I will only add half so the noodles do not overpower the other ingredients.


I had a lot of fun making these and didn’t make nearly the mess that I thought I would!

Cooking is love made visible.

-quotegram

Chicken and Rice Casserole

We are always looking for easy delicious meals to make in our house and the other day while doing a simple chicken casserole search I came across this >> link << recipe on http://www.allrecipes.com.

Listening through the recipe as well as comments I made some very simple/easy changes to it to suit our tastes better. The follow are changes made, pictures as well as our final thoughts 🙂

  • I can never just use unseasoned meat so I peppered the chicken. There is a quite a bit of sodium in canned cream soup so I did not salt it.
  • Also, the chicken we get from Kroger in the family packs is always very thick so I basically butterfly it but instead of leaving it butterflied I cut it all the way through. So this is actually 3 pieces of chicken cut to make 6 pieces.

s&p chicken.jpg

  • We buy our cream soup in family sized cans so we had a few more ounces than the recipes 21.5 ounces.
  • We prefer fresh mushrooms so I substituted 2 cups of sliced fresh mushrooms in place of the 1 (4.5 ounce) can sliced mushrooms
  • Because this casserole was prepared the day before and reheated for the next nights dinner I added an additional 1 cup of liquid. Which in this case was chicken broth. (This decision was made after the picture on the right was taken so the rice mixture will be a little looser if you add the additional cup of liquid)
  • After listening to several reviews I noticed people commenting that next time they made it that they would cut back to only using 1/2 of the packet of Onion Soup mix as the flavor was strong to them.  Now I used a generic brand (the recipe calls for Lipton) and since I did that I did use the whole packet but if this concerns you then I would suggest only using 1/2 the packet the first time you make it.


Unbaked Casserole

chix cass unbaked

Baked Casserole. You will not get a “browned look” with this particular recipe.

  • I stirred the rice mixture up after uncovering the casserole then put it back in the oven for the additional 15 minutes.

chix cass baked.jpg

I served the casserole with Roasted Asparagus. I think almost any veggie would go nicely with this or even a small side salad.

Final thoughts….

  • Crispy onions would be a fabulous topper for this to give you a crunch factor or even a bread crumb/parmesan cheese mixture would be delicious.
  • I am glad I peppered the chicken and chose not to salt it.  Browning it ahead of time might not be a bad idea either.  It would give the chicken more texture and that browned flavor.
  • Adding the additional liquid I feel was a good call.  It enabled the casserole to still have a creamy texture even though it was reheated.
  • Using the full packet of the soup mix worked for us.  Like previously stated, if you are nervous the flavor will be to strong try adding half of the packet and then if you find that you would like the flavor stronger then the next time you make it add the whole packet.
  • The texture of the fresh mushrooms was a good compliment to the other ingredients.  If all you have or you just like them better I think canned mushrooms will work just fine also 🙂
  • Ideas/Changes to take the casserole in a different direction:
    • dice the chicken, season and brown it
    • prepare the rice mixture per recipe but add in a cup (or more) of peas and carrots as well as stir the diced chicken in at this point, spread in baking dish
    • top with stuffing and finish preparing per recipe
  • If you like to meal prep/make freezer meals I think this would freeze and bake up nicely.  This is something I will for sure be trying in the future.


All in all we liked this recipe.  It will for sure go in the repeat category!

*Did you tweak the recipe in any way when you made it? Was there something you would change next time? Add or take away from the recipe? I would LOVE to hear your thoughts!*

Link to original posted recipe click >> HERE


Also, if there is a something you are wanting to try but are nervous about testing out a new recipe let me know and it might be one that we try and then feature here on my blog 🙂


Cooking is love made visible ❤

Source: quotegram


“Swirly Whirly” Cupcake Pillow


I came across a pattern one day to make a donut pillow.  Yes, you read that right.  Donut Pillow!  How neat and different!  I saved the pattern (pattern available here) and kind of forgot about it.  If you are a crafter you know how that is.  So many patterns so little time lol.  Well a month or so later I came across that pattern again and thought I would give it a whirl.

After sharing the donut pillow picture on Facebook I was asked if I could make a cupcake pillow.  I thought ok, I think I could do that and started scouring the web for a pattern.  After a few days of off and on searching I was finding mostly small appliques, amigurumi’s and hat patterns.  It was becoming clear that I was not going to find what I was looking for/wanting so I became determined to make up my own pattern.  *This pattern actually came to be months before my “Hold My Towel” Holders (my pattern found here).*
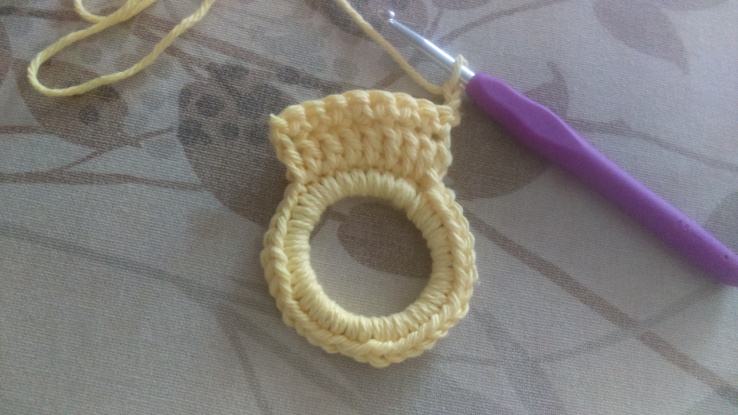
I started with the “cake” part of the cupcake and rather quickly figured out a stitch combination that gave me that texture/look that I was wanting.  I knew like cupcake liners I wanted it to have ridges.  From there I decided that the cake and icing where going to be two separate pieces and in the end would be sewn together.  Feeling pretty confident and proud of myself I thought the icing would be smooth sailing. HAHAHAHAHAHA oh was I ever wrong.  I wanted the icing to have the swirl look to it and nothing I tried seemed to give me that desired effect.  I went back to the web and went through crochet stitches listening through descriptions of ones I already knew and ones I didn’t.  It was while I was doing this that I was reminded of HDC (half double crochet) and the third loop on a HDC.  Eureka!!!  I was going to alternate rows of regular HDC and HDC’s in the third loop of the previous rows HDC.  Stitches decided I sat down and started testing if this would work and wouldn’t you know it….it did!  I had a couple flub ups.  Losing track of what kind of row I needed to be doing, making the increased area to large etc.  Determined to make it work I would sigh and frog the work that was wrong and start over.  With many deep breaths and pep talks I give you ‘Swirly Whirly” Cupcake Pillow!  I hope it gives you just as many smiles as it gives me 🙂

Cupcake Pillow

Materials:
Worsted Weight Yarn: 1 color for “cake” part, 1 color for the “icing”, a small amount of red for the cherry, and small amounts of rainbow color (or) brown for sprinkles
H 5.0 mm hook
Polyfil
yarn needle
scissors
Foam (optional) Cut into a cylinder (6.25″ x 4″) to fit inside your “cake”

Stitches:
MC – magic circle
ch- chain
st(s)- stitch(es)
rd – round
sc – single crochet
slst – slip stitch
hdc – half double crochet
fphdc – front post half double crochet
bphdc – back post half double crochet
blo – back loop only
dbl – double crochet
tl- third loop
sc2tog – single crochet 2 together

Special Stitches:
Shell Stitch (ShSt) – 4 dbl in the same stitch
TL of a hdc: Video to show you how to locate this – https://www.youtube.com/watch?v=d2nyqJZBfvA
sc2tog: Video to show you how to do this – https://www.youtube.com/watch?v=rAQWZMZJXnE

Special Instructions:
Ch. 1 does not count as a stich unless otherwise noted in the pattern

Cake:
Rd 1: MC, ch 1, 12 hdc into mc, sl st into first hdc, ch 1 (12 sts)
Rd 2: 2 hdc in same st as ch 1, 2 hdc in each remaining sts of the round, slst into beginning hdc, ch 1 (24 sts)
Rd 3: 1 hdc in same st as ch 1, 2 hdc in next st, *1 hdc in next st, 2 hdc in next sts*, repeat * to * until the end of the round, sl st into beginning hdc, ch 1 (36 sts)
Rd 4: 1 hdc in same st as ch 1, 1 hdc in next st, 2 hdc in next st, *1 hdc in next 2 sts, 2 hdc in next st*, repeat * to * until the end of the round, sl st into beginning hdc, ch 1 (48 sts)
Rd 5: 1 hdc in same st as ch 1, 1 hdc in next 2 sts, 2 hdc in next st, *1 hdc in next 3 sts, 2 hdc in next st*, repeat * to * until the end of the round, sl st into beginning hdc, ch 1 (60 sts)
Rd 6: 1 hdc in same st as ch 1, 1 hdc in next 3 sts, 2 hdc in next st, *1 hdc in next 4 sts, 2 hdc in next st*, repeat * to* until you reach the end of the round, sl st into beginning hdc, ch 1 (72 sts)
Rd 7: 1 hdc in same st as ch 1 , 1 hdc in 4 sts, 2 hdc in next st, *1 hdc in next 5 sts, 2 hdc in next st*, repeat * to * until the end of the round, sl st into the back loop beginning hdc (84 sts)
Rd 8: this round will be done in blo. 1 hdc in blo of same stitch as ch1, 1 hdc blo of each st around, sl st into (BOTH loops) beginning hdc, ch1. (84 sts)
Rd 9: fphdc around same st as ch 1, bphdc around next st, *fphdc around next st, bphdc around next st*, repeat * to * until the end of the round, sl st into beginning hdc, ch 1 (84 sts)
Rd 10-21: Repeat Rd 9
Rd 22: hdc in same st as ch 1, hdc in each stitch around, sl st into beginning hdc, tie off
Weave in ends

Icing:
Rd 1: MC, ch 1 12 hdc into mc, sl st into beginning hdc, ch 1
Rd 2: 2 hdc in tl of same st as ch 1, 2 hdc in tl of each remaining sts of the round, slst into beginning hdc, ch 1 (24 sts)
Rd 3: 1 hdc in same st as ch 1, 2 hdc in next st, *1 hdc in next st, 2 hdc in next sts*, repeat * to * until the end of the round, sl st into beginning hdc, ch 1 (36 sts)
Rd 4: 1 hdc in tl of same st as ch 1, 1 hdc in tl of next st, 2 hdc in tl of next st, *1 hdc in tl of next 2 sts, 2 hdc in tl of next st*, repeat * to * until the end of the round, sl st into beginning hdc, ch 1 (48 sts)
Rd 5: 1 hdc in same st as ch 1, 1 hdc in next 2 sts, 2 hdc in next st, *1 hdc in next 3 sts, 2 hdc in next st*, repeat * to * until the end of the round, sl st into beginning hdc, ch 1 (60 sts)
Rd 6: 1 hdc in tl of same st as ch 1, 1 hdc in tl of next 3 sts, 2 hdc in tl of next st, *1 hdc in tl of next 4 sts, 2 hdc in tl of next st*, repeat * to* until the end of the round, sl st into beginning hdc, ch 1 (72 sts)
Rd 7: 1 hdc in same st as ch 1 , 1 hdc in 4 sts, 2 hdc in next st, *1 hdc in next 5 sts, 2 hdc in next st*, repeat * to * until the end of the round, sl st into beginning hdc (84 sts)
Rd 8: 1 hdc in tl of same st as ch 1, 1 hdc in tl of each st of the remaining sts around, sl st into beginning hdc, ch 1 (84sts)
Rd 9: 1 hdc in same st as ch 1, 1 hdc in each of the remaining sts around, st st into beginning hdc, ch 1 (84 sts)
Rd 10-17: Repeat Rds 8 & 9
Rd 18: 1 sc in same st as ch 1, 1 ShSt in next st, *1 sc in next st, 1 ShSt in next st*, repeat * to * until the end of the round, sl st in beginning sc, tie off leaving long tail (You will be using this to sew your Icing to your Cake)

Sprinkles:
Make as many or as few as you want. *I made 24+
Chain 4, tie off

Cherry:
Rd1: MC, ch1, sc 4, sl st into beginning sc, ch 1 (4 sts)
Rd 2: 2 sc in same st as ch 1, 2 sc in remaining sts, sl st into beginning sc, ch 1 (8 sts)
Rd 3 & 4: sc in same st as ch 1, 1 sc in each st around, sl st into beginning sc, ch 1 (8 sts each Rd)
Rd 5: sc2tog the st of the ch 1 and the next st, *1 sc in next st, sc2tog*, repeat * to * 1 times, sl st into beginning sc2tog (4 sts)
tie off making sure to leave enough of a tail to sew up the small hole and attach your cherry to the icing
Attach cherry to icing

Attaching Sprinkles:
Thread each of the sprinkles through your icing. I threaded one end through the icing and then extended the sprinkle 2 rows (this is roughly the width from one “ridge” to the next) and threaded the other end through. Tie a knot with your tails making sure not to pull to tightly on the knots first loops as this will pull the sts of the icing and cause gaps. Snip ends.

Attaching Icing to Cake:
*if you have opted to use foam to fill your “cake” portion insert it now*
Using the Whip Stitch: attach Rd 18 of your icing to Rd 22 of your cake. Once you are 1/2 way done start stuffing your cupcake making sure to add more stuffing as you go. Be mindful of how much you stuff the “cake” part as the sides will start to bulge. Tie off and weave in ends.

TADA! You now have the most sugar free, carb free cupcake ever!

If you come across any errors or have any questions do not hesitate to reach out to me!


The most authentic thing about us is our capacity to create, to overcome, to endure, to transform, to love and to be greater than our suffering.
-Ben Okri


**PLEASE DO NOT COPY, ALTER OR TRY TO PASS THIS PATTERN OFF AS YOUR OWN. IF YOU CHOOSE TO SELL ITEMS COMPLETED FROM THIS PATTERN PROVIDING A LINK BACK TO MY BLOG IS ALWAYS APPRECIATED BUT NOT REQUIRED**


“Hold My Towel” Holder

While crocheting a hat for “From Netta, With Love” I was trying to think of a small project I could whip up to offer on my crochet page.  Something that would make a great gift but still be affordable.  I didn’t want to pause what I was working on and search the web so I tried to think of something that I could easily make up a pattern for on my own.  Project decided, I finished the hat and then got out all the materials I thought I would need for the new project and got to work playing around with how I wanted it to look.  I went with a simple design that could be “dressed up” by using decorative or colorful buttons.  These would work on your oven door handle, fridge handle or even on the towel rack in your bathroom.  Stay with me.  I know that last one sounded kind of silly but these holders are for hand towels so think about it.  You could choose a different button for each member in the family and so they would each have their own holder.

Make sure to check clearance areas wherever you buy your materials. You may just find some awesome buttons for a super cheap price! Also keep in mind that your buttons do not have to be round 😉

This holder would be awesome as part of a kitchen gift set.  I have included a picture of a possible gift set option.  In this set I included 2 “Hold My Towel” Holders, 1 Flower Hot Pad (Ravelry Pattern) and 1 Round Pot Holder (I worked up 2 circles and then connected them with a round of slip stitches. The sky is the limit with this one)

finshed holder set 1


“Hold My Towel” Holder

Materials:
Worsted Weight Yarn *I used Sugar & Cream cotton yarn but acrylic would work too* I do not know exact yardage but it’s not very much
G – 4.5mm Hook
2 Ponytail elastics
Embroidery needle
Button *this is what will “dress up” your holder* and thread to attach

Towel Holder Materials

Notes:

  1. CH 1 and CH 2 do not count as a stitch throughout the pattern
  2. If you are wanting to use a rather large button then I would suggest doing a treble crochet instead of a double crochet  and possibly 1-2 more chains on your button hole row (Row 18)

Stitches:
SL – slip stitch
Rd – round
CH – chain
Sc Cr – single crochet
Dbl Cr – double croche
St – stitch
Sts – stitches

SL to attach yarn to elastic. CH 1

sl to start holder.jpg
Rd 1- Sc around elastic until it is completely covered. SL into 1st sc. Ch 2

sc around holder.jpg

-You will now be working in rows to make the strap-
Row 2 – dbl cr in same st as CH 2. Dbl cr in next 7 st. CH 1 and turn
Row 3 – sc in same st as CH . sc in next 7 sc. CH 2 and turn.

Holder Sc row
Rows 4-17 – repeat row 2-3
Row 18 – dbl in same st as CH. Dbl in next 3sts, ch2 (this will be your button hole), dbl into last 4 stitches. CH 1. Do not turn.

Holder Button Hole.jpg

Edging- sc 3 into the side of the dbl cr. (This will make you corner) Sc down the side of the strap. Once you reach the ring, SL st around until you reach the other side of the strap. Sc up the side of the strap. When you reach the last row of dbl sc 3. Sc across the top of the strap. SL st into the 1st sc of the edging. Tie off and weave in your ends.

Attach button of choice with thread of choice and there you have it!

Completed Holder.jpg


Note: Please do not copy or sell this pattern in any way. If you choose to sell completed items please remember providing a link back to this pattern is always appreciated, but not required.

Challenges of a New Place

Per the suggestion of my best friend Allie I am going to share with you some of the things that are involved when someone who is blind is moving into a new place.

Let’s start with orientation and mobility…

Orientation refers to the relationship between a person and the physical space that surrounds him/her. It includes conceptualizing spatial relationships, such as right angles for negotiating intersections and understanding the layout in one’s own home or office so that a person can confidently and efficiently function in these environments.
Mobility refers to techniques used to move safely through the environment while getting from Point A to Point B.
If you found that ^^^ information interesting you can read more here.
When I am out and about I use my cane to help me navigate my surroundings. Basically my cane and my hearing work as my”eyes”.  When I am in the comfort of my own home the cane gets tucked in the corner and forgotten about until I get ready to go somewhere. Learning the layout of our new apartment wasn’t hard for me per say as it is a relatively small place. I trailed the walls and practiced walking across rooms and such probably 3-4 times and at that point I felt decently confident.  For me it was staying in the mind that I was in a new place. Most might say “You forgot your were in a new place?!?!” Why yes, yes I have. All it took was concentrating completely on navigating the buildings stairs and hallways (while moving in our things) and then being happy I did it independently (albeit slowly) for me to drop the ball on focusing on where I was and where I was going after I walked in my front door. While concentrating so hard on navigating 2 sets of stairs and a small hallway while not only carrying something but not having my cane I found the apt door, walked through it and immediately veered to the left a little and BAM ran right into a wall. See in our old place when you walked in the front door you were in the living room and if you veered to the left a little bit it would have had you walking through the open area of the living room and to the couch. In the first few week I have woken up a couple of mornings and “forgot” where my bedroom door was.  Eventually it will all just mentally be there but it takes time. The next step for me as far as orientation and mobility goes will be getting familiar with the neighborhood and learning and practicing getting to and from the bus stop. Luckily, aside from getting to and from the first bus stop, the bus travel I take to work will be the same as it always has been for me.
IMAG0925
Organization…
Once you get familiar with the layout of the apartment then comes the organization/placement of everything. This is the norm for anyone moving right? In our house our big goal is to only “place” things once. We think hard about how we want things to be so once it’s done then I can just focus on getting use to where everything is.
The food might not sound like a big deal to most but organizing (and never changing) the way food is put away especially canned goods is important so I can be confident that I am not opening a can of diced tomatoes when I need a can of corn. There are ways to label most of everything but I have found repeatedly put things in the same place works best for me.
Appliances…
Appliances have been the most frustrating thing for me as far as the new place goes but it’s not because they don’t work properly or anything like that. It’s because I apparently tossed out my bump dots without realizing it while packing. Bump dots (see Here) are peel and stick dots that people who are blind or visually impaired use to mark everyday items. They help me tactically navigate our appliances, my work phone, computer keyboard etc. since I can’t just look at them and know where the buttons or settings are that I need. I know the nice flat touch buttons on stoves/microwaves probably make them look nicer but let me tell you…you can’t FEEL those touch buttons (until they are nice and worn in) which in turn creates a small issue for someone who can not see.  R and I discussed using tape or stickers until my new ones came in but honestly it was easier for him to start things for me and then we didn’t have to worry about trying to pick the temporary stuff off of the appliances when my bump dots arrived. The day I got home with my bump dots was a good day. I can now independently use my dishwasher, stove/oven, microwave and washer/dryer. It’s a lot easier to get things done when I am not constantly having to ask R to help with these things.
 Moving to our new place has had it’s challenges but I wouldn’t trade it for anything. I am still working on getting everything set up exactly right and with time that will happen.
“Everyone faces challenges in life. It’s a matter of how you learn to overcome them and use them to your advantage.”
-Celestine Chua

Moving

The day has finally arrived! We got the keys to our new apartment 🙂 I am beyond excited for this change in our lives. It almost feels like a fresh start…or a clean slate if you will. We are only moving a few miles from where we have been living but where we will be is so much nicer and much safer which is a big thing! One of the main reasons we decided to relocate to the city where we now live was because as someone sight impaired I could be more independent with going places as there are fixed route buses. I am really looking forward to getting some of that independence back now that we will be in a safer area.

I must say there is nothing like packing to move to show you how much stuff you have accumulated over the years! With the packing comes the tossing out of the things that you never use or didn’t even remember you had. I realized last night that there were THREE cabinets in my kitchen I never open. And in turn that means I never use the things in those cabinets. Craziness. 95% of what was in them will not be going with us to the new place. What a way to de-clutter your life!

The days it will take to move will be tiring but SO WORTH IT!

If I have learned nothing else from this move so far I have learned this:

It is completely okay to BUY your moving boxes (yay for things not smelling like produce when it’s unpacked lol) $1.09 at Wal-Mart

Do not forget tape and markers!

Do not wait until the last minute to start packing!!!!! We are 2/3 of the way done packing at this point I think.

Do not forget to LABEL THE BOXES!

A dolly comes in very handy. Don’t own one? You can rent them! ($10 at U-Haul)

If at all possible stagger your move-in and move-out date if you can. Much less stress this way! It gives you more time to move as well as clean the previous place.

*Deep Breath*

The move will officially begin tomorrow and I can’t wait until we are settled.  Then it will be time to relax and enjoy our new home!IMAG0888


Cleaning out the past, packing up the present and preparing for a much better future!


Giving it a whirl…

My blog is not going to have just one focus.  It will be a hodgepodge of things. My mind is in a constant whirl of all that I enjoy, learn and encounter so why not share those things with you! Some of the things that I plan to post about are books I read, recipes, crochet patterns, things I use to make the world more accessible to me and anything else I think you all might find interesting.

Join me on my journey into the world of blogging!

The best and most beautiful things in the world cannot be seen or even touched –  they must be felt with the heart.

Helen Keller